Foreword : The measuring machine is the same as other precision measuring instruments, and the materials used are not absolutely good or bad. Only by fully understanding the use environment of the measuring machine, measuring efficiency requirements and physical properties of various materials, combined with excellent structural design and measuring machine system design, the material can be scientifically selected and the physical properties of the material can be fully utilized to meet Measurement requirements.
Based on the analysis of temperature, motion and process characteristics of different materials, this paper proposes suitable materials for measuring instruments with different precision, environment and measurement efficiency, so as to provide scientific basis for correct selection.
First, the parameters related to the selection of measuring machine materials:
1. Temperature characteristics:
As a high-precision measuring device, the measuring machine needs to respond to or compensate for the temperature change of the installation environment in order to maintain its high precision. Among them, the temperature characteristics of the main components of the measuring machine become one. A very important indicator.
To evaluate the temperature characteristics of materials, we mainly analyze the three main parameters of thermal expansion coefficient, thermal conductivity, thermal expansion coefficient / thermal conductivity. The following table shows several materials commonly used in measuring machines, including aluminum alloy, ceramics, granite and steel. The relationship between the parameters:
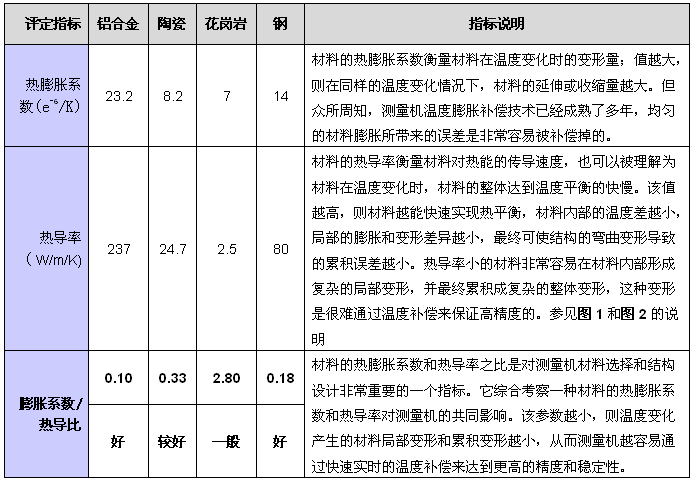
Through the temperature characteristics of the above materials and related instructions, we can easily see:
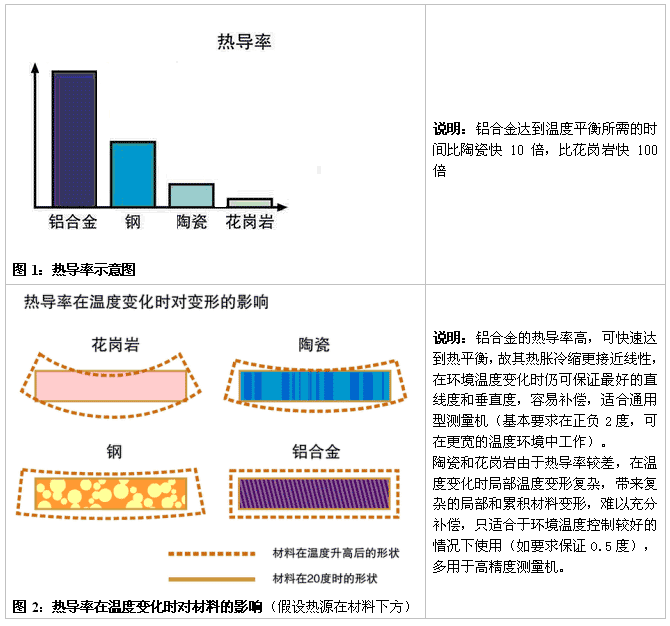
* For general-purpose measuring machines, the machine needs to maintain high accuracy under relatively loose temperature conditions (basic requirements are plus or minus 2 degrees, but many machines can work in a wider temperature environment). In this case, the effects of temperature variations and inhomogeneities (by local and cumulative deformation) are often greater than the effects of uniform expansion of the material. The simple expansion caused by the thermal expansion coefficient of the material can be effectively compensated by the temperature compensation technique, but the compensation of local and cumulative material deformation is very difficult and difficult to accurately compensate. Therefore, for the general-purpose measuring machine, under the premise of ensuring the expansion coefficient/thermal conductivity ratio, the thermal conductivity of the material should be more focused, and the operating characteristics and process characteristics that we will discuss later, the aluminum alloy is currently economical in the industry. The best material to use.
* For high-precision machines located in very good temperature environments, the machine emphasizes precision and uses ultra-high precision to ensure high temperature environment requirements (such as guaranteed to be around 0.5 degrees) and as small as possible. Unit expansion rate. Therefore, in the choice of materials should be based on the use of a lower coefficient of expansion / thermal conductivity material, more emphasis on the thermal expansion coefficient of the material (better materials such as granite, ceramics).
2. Sports characteristics:
Continuous efforts to improve efficiency are one of the most significant features of modern manufacturing. At the same time, measurement systems are widely used in the shop floor, requiring faster measurement feedback for the manufacturing process. Therefore, the motion performance of the measurement system can not only be provided. Smoother and smoother motion characteristics improve measurement accuracy and repeatability while providing higher measurement speed and efficiency. Measuring the motion characteristics of the system is another indicator that needs attention in addition to accuracy.
Material density and stiffness (elastic modulus MPa) are two important indicators that reflect the motion characteristics of the measurement system. The following table lists the main material related indicators and analysis used by the measuring machine:
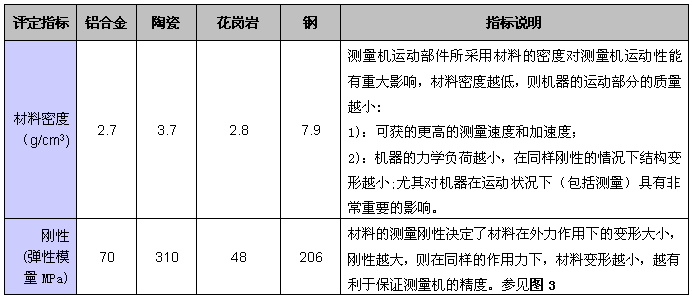
Based on the above analysis, we can draw the following conclusions:
* After the compensation technology is widely used by coordinate measuring machines, rigidity is no longer the most important indicator of reference material properties, because the static deformation of materials and deformation compensation under low speed/acceleration have become the standard of mainstream CMM manufacturers. means. The most complex stiffness-deformation conditions come from deformation and motion control errors (moving position loops consisting of machines, drives, control systems, etc.) that occur when the machine is operating at higher speeds/accelerations. In this case, the weight of the moving part (reflected in the material density characteristics) is extremely important, and its influence on the accuracy of the system is not a simple multiple but a series relationship.
* For general-purpose measuring machines, under the guidance of the design idea of ​​maximizing user benefits, the machine needs to pursue higher efficiency while ensuring higher precision. Therefore, in the selection of materials, the density of the material should be more focused on the lighter density/density ratio, and the quality of the moving part should be reduced by optimizing the structural design. In this case, the advantages of aluminum alloy are more apparent. This is also why machines of the same precision, some companies' machines can run more efficiently, while others can only measure slowly. Inefficiency means investing more money in measuring equipment and paying more labor and longer resources.
For high-precision measuring machines (within 1 micron accuracy), the machine emphasizes more precision than speed. Therefore, in the choice of materials, the rigidity of the material itself is often more focused on the premise of higher rigidity/density ratio, or the overall rigidity is increased by increasing the size of the material. Both are effective methods adopted by the industry.
3. Manufacturing processability and flexibility of materials:
With the increasing demand for coordinate measuring machines, the manufacture and production of measuring machines are required to be transformed from the original single-piece production mode to more efficient mass production, so that the quality of the products is more stable and the manufacturing efficiency is higher, thus serving customers. Provide measurement products with better cost performance. In this context, the manufacturing process of the main components of the measuring machine becomes an important indicator for the measuring machine manufacturers.
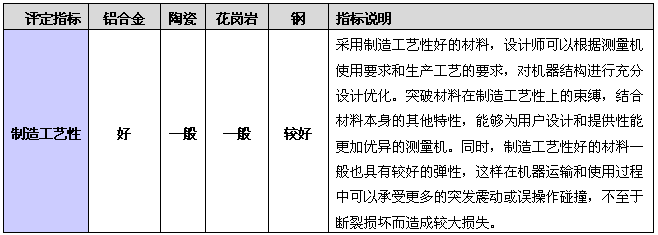
Aluminum alloy is an excellent material for general purpose measuring machines:
* In general, unless some core design or manufacturing techniques cannot be broken or lack of processing (at reasonable cost), the designer of the measuring machine should select materials with better manufacturing process after comprehensively balancing other material properties.
* Aluminum alloy is a good comprehensive performance material and has very good manufacturing process. It is an excellent material for versatile measuring machines. However, some measuring machine manufacturers with weaker strength or relatively backward technology have not mastered the material forming and high-precision machining technology of large-size aluminum alloy beams, and thus have to give up the use of aluminum alloy materials or can only be used locally. In fact, because the measuring machine uses aluminum alloy materials to have significant advantages, many manufacturers who claim to use other materials actually use aluminum alloys in places where their technical capabilities are, such as: Z-axis, carriage, left and right legs, etc. The manufacturing and processing technology of parts is relatively easy compared to beams. Manufacturers with backward technology can't even break through the manufacturing technology of aluminum alloy Z-axis.
Second, how to choose the right measuring machine material:
Based on the relevant parameters of the temperature characteristics, dynamic characteristics and process characteristics of the materials (aluminum alloy, ceramics, granite, steel) mainly used in the above comprehensive analysis measuring machine, taking into account the use of measuring machines in today's manufacturing industry. Characteristics, use environment, accuracy and efficiency requirements, we can easily see:
1. Universal and workshop type measuring machines:
Such measuring machines have high requirements for measurement efficiency while ensuring high precision, and the working environment in which they are located is general. In summary, aluminum alloys are ideal for designing such measuring machines.
The specific instructions are as follows:
1.1 In the case of changes in ambient temperature, due to the large change in external temperature, it is necessary to use a material with better thermal conductivity in consideration of the expansion coefficient/thermal conductivity ratio. In this respect, aluminum alloy is the best material.
1.2 While ensuring the rigidity/density ratio of the material, the aluminum alloy has a low density, which helps to improve the dynamic performance of the measuring machine while ensuring accuracy, thereby improving the measurement efficiency. In particular, the aluminum alloy material is matched with the design of high-precision triangular beam, which fully exploits the excellent characteristics of the ideal material of aluminum alloy, and is a classic masterpiece of measuring machine design.
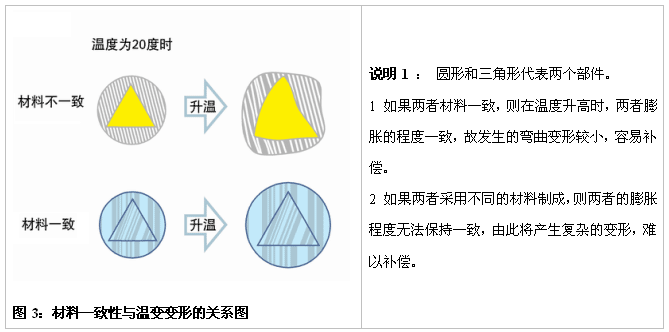
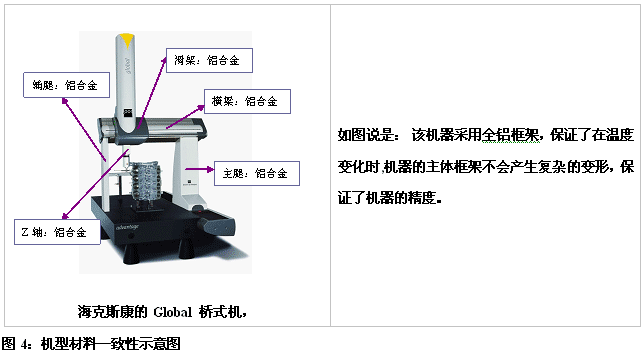
1.3 Aluminum alloy material is easy to achieve material consistency. For example, Global is an all-aluminum frame. The advantage is that when the temperature changes, the deformation of each part is consistent and easy to compensate. Otherwise, if the beam, the carriage and the Z-axis of the machine are made of different materials, the amount of expansion when the temperature changes is different, resulting in distortion of the expansion deformation of the machine. This deformation is nonlinear and difficult to solve by temperature compensation. See the picture below:
The following figure illustrates the Hexagon's Global measuring machine as an example:
2. High precision measuring machine
The accuracy requirements of this type of measuring machine are first, and the speed requirements are general; due to the high value, it is generally equipped with a special working environment, and the environment is better. The selection of moving parts requires both density and rigidity. For fixed parts, the density/rigidity ratio is relatively loose. Generally, the rigidity of the fixed part is increased, so that the material of the fixed part can be ceramic or granite.
Third, the conclusion:
The selection of suitable measuring machine materials requires a comprehensive consideration of the temperature characteristics, dynamic characteristics and process characteristics of the materials, as well as the consideration of the use of the measuring machine, accuracy requirements, efficiency requirements and other comprehensive factors. The innovation of technology is endless, requiring measurement machine manufacturers to integrate the latest material technology, processing technology, compensation technology and control technology, using the measuring machine materials suitable for the specific application needs of customers.
Auto Led Back-Up Light,Car Backup Lights,Car Back Up Lights,Car Back Up Light
CHANGZHOU CLD AUTO ELECTRICAL CO.,LTD , https://www.cld-led.com